Will Watts
The drive I bought was a 'naked' refurbished TEAC FD55F (80 Track) from Display Electronics. The price (including VAT and P & P) was £35.78; they even do a 40 Track even cheaper!
The case and power supply unit were bought as surplus stock from the 'Bargain List' pages of Greenweld Electronics, price £12.95 plus £3.00 P & P. A total altogether of £51.73.
The next cheapest price I could find for a refurbished drive with case and PSU was from FRC Electronics who can supply one for the BBC at a total cost of £80.49, including postage, packing and VAT.
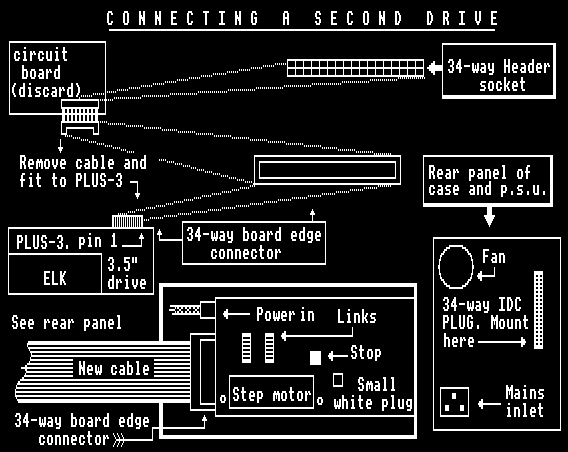
Now for the tricky bit - connecting it all together. The case with PSU comes to bits and inside is a circuit board which has a ribbon cable attached with a 34-way board edge connector on one end and a 34-way IDC header socket on the other (plugged into board). Remove this cable and throw the board away - unless you have some other use for it.
All the screws etc are provided to enable you to mount the disk drive and the standard power connector plugs straight into the back of the drive. I have an original Acorn Plus 3 so I'm not sure about the interface connections for other set-ups but I would imagine it shouldn't be vastly different.
The cable that you rescued earlier on now plugs straight onto the board edge at the rear of the Plus 3 (immediately behind the 3.5" disk drive). Although the Plus 3 User Guide is decidedly sketchy on this matter, I've discovered by trial and error that looking from the front of the unit, pin 1 (marked with an arrow on the connector) is to the right. If you observe this, the plug can only go one way up (If you put it upside down, pin 1 will not be on the right). Next you need a ribbon cable with a 34-way panel mounted IDC plug on one end and a 34-way board edge connector on the other. A local computer spares supplier/repairer should be able to provide one or you can contact PRES Ltd.
The panel mount plug will attach to the hole in the back panel of the case vacated by the removal of the circuit board. The cable from the Plus 3 will now plug into this and the free end (inside the case) will slot on the rear of the 5.25" disk drive.
Finally you need a power cord for the power supply unit. I used one from an old printer; they are not hard to come by but if you're stuck, Maplin do one: Catalogue No. BW99H (£2.45 and £1.40 handling).
It sounds a bit complicated, but when you have all the bits in front of you, it's fairly straightforward and I'll happily answer any queries to the best of my ability.
Once you've got your new drive connected up you can test it by formatting a disk and saving a file onto it. Reload the program and attempt to run it. The drive head may be a fraction off alignment however; in which case it may work ok but all your disks will be useless on anyone else's drive and their disks won't run on yours.
FRC ELECTRONICS (Disk drive specialists) will do a complete re-align and fault diagnosis for a total of £31.14 (including VAT and return P&P), plus whatever it costs you to post the drive to them. But if you're going to do this you may as well buy a refurbished BBC drive instead. Thus, if you're fairly handy with a screwdriver and feeling brave you can attempt the following:
- All - Obtain a formatted disk from someone with a drive known to be ok and obviously formatted to whichever system you have (DFS or ADFS).
- DFS - (for ADFS go to 3) Assuming you have set your "new" drive as drive 1 (DS1) put the disk you've obtained from the good drive in and type *CAT 1. If your drive's ok you should get the disk details and a catalogue of programs (if any) on screen. I recommend you use a disk without any programs on in case it gets damaged. If your drive is out of alignment you will get, after what seems like eternity, "Disc Error 18 1:00/00" or something similar. (Go To 4)
- ADFS - Assuming you have your "new" drive set as drive 1 (DS1), put the disk you've obtained from the good drive in and type *MOUNT 1. If your drive's ok you will get the prompt > on screen. If your drive is out of alignment you will get (after what seems like after eternity), the on-screen message DISK ERROR 50 1:00/00 or something similar.
- All - At the rear of the disk drive circuit board (the side with all the links on) you will find a small white plug with multi-coloured wires attached. This comes from the stepper motor. Carefully unplug this plug. When you now come to activate the drive (as in 2 or 3) the disk will rotate but the head will not move.
- All - Activate the disk (as in 2 or 3) and carefully move the head (it moves quite freely on its runners with the motor disconnected) until you get the appropriate display on screen. You may have to have a few goes as if you're not quick enough, the DISK ERROR message will appear before you've located the head correctly.
- All - There is a stop with a screw in it which stops the head going too far back. Slacken the screw and adjust the stop so that it touches the back of the head at the point you've just found. Check by running the drive that you've not inadvertently moved the head a fraction. Adjust as necessary and when you're happy tighten the screw as much as possible.
- All - Reconnect the little white plug. If the head now moves away from the stop i.e to the right (as in my case), slacken the two screws holding the stepper motor in place and carefully slide the motor left or right (with the power still connected) until the head comes to rest on the stop. Tighten the two screws as much as possible.
Your drive should now be re-aligned and all disks previously produced on it will be unreadable. All you need do now is reformat them and as a double check run them on the drive you got the reference disks from.
Supply Addresses
DISPLAY ELECTRONICS, 32 Biggin Way, Upper Norwood, LONDON SE19 3XF. Tel: 081 679 4414
FRC ELECTRONICS, 52 Queensway, Caversham Park Village, Reading, BERKSHIRE RG4 0SJ. Tel: 0734 479550
GREENWELD ELECTRONICS, 27 Park Road, SOUTHAMPTON SO1 3TB. Tel: 0703 236363
MAPLIN ELECTRONICS, PO Box 3, Rayleigh, ESSEX SS6 8LR
PRES, PO Box 319, Lightwater, SURREY GU18 5PW. Tel: 0276 472046
John Crane, EUG #12