Dare you face the challenge?
Greetings, one and all. This is your Beebmeister Chris Dewhurst speaking and I challenge you to solve my puzzle of shields...
Features:
- 4-way multidirectional scrolling
- Large, easy-to-see, double-size sprites
- Total adventure 32x size of screen
- Transporters
- Built-in screen and sprite editor allowing you to create your very own graphics and fiendish puzzles for your friends!
- Exclusive to EUG
Instructions
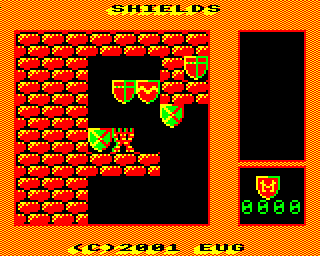
When the game has loaded, you are presented with a menu. Press the 1 key to start the game (Other menu options are discussed below.) The idea is simple, but the challenge is awesome: you must match up pairs of shields of like design. When this is done, a shield of a different design will appear, and you must match two of these, and so on.
Eventually a 'Master' shield will appear and collecting this will decrement the counter on the bottom right of the display. The game is complete only when this counter reaches zero.
Scattered around are transporters which will take you to different sections of the maze. Map pieces may also be collected to help you on your quest. These enable a plan view of the complete adventure to be drawn in the window on the right.
You have all the time in the world to complete your task. If you make a mistake (by pushing the wrong shield into a corner, for instance) you can quit the game by pressing ESCAPE. Use A, S, L, and P to move left, right, down and up respectively. Pressing M updates the map to the right - provided have collected a map piece, of course.
The Editors
Shields boasts a complete built-in sprite designer and screen editor that allows you to devise your own characters and cunning puzzles.
Pressing 2 from the main menu will take you to the screen editor. You are presented with three windows. The large map window displays miniature versions of the characters in the game. The long character window below shows characters available, and the small sprite window on the bottom right displays a character at its true size. If you want to design your own screen from scratch, as opposed to altering the current one, press W twice to clear the map.
The map window is where you arrange the puzzles. Move the cursor (green square) around the map window with the cursor keys. The character which the cursor is currently on is shown real size in the sprite window. Only one quarter of the total playing area is shown at any one time. To reveal more, either move the cursor to the bottom of the screen and press the down arrow key to scroll line by line, or press SHIFT-Cursor Up or SHIFT-Cursor Down to jump to the next quarter of maze.
The number keys 0 to 7 will print the corresponding character at the cursor as indicated in the character window. For example, pressing 7 will place a brick character on the screen. However, pressing 3 will place a sheild of type 4, pressing 4 will place a shield of type 3, and so on. This can be confusing, so using the SHIFT key in conjuncton with the number key (1-4) of the shield will have the same effect.
When laying out transporters, one transporter must always have a corresponding transporter elsewhere on the screen, i.e. a transporter entrance (where the player goes in) and a transporter exit (to where he/she is taken). The first time you press 2, a high beep will sound and a tick will appear over the transporter character in the character window. The next time you press 2, a low beep will sound, the tick will disappear and the cursor's position will be the transporter exit.
You may not overwrite a transporter with another character unless it is a transporter entrance, in which case both the entrance and corresponding exit will be deleted. To find out where a transporter entrance goes to, position the cursor over the entrance and press T. The cursor will be taken to the exit; this will not happen if the cursor was over a transporter exit to begin with.
A maximum of 64 transporter entrances and 64 transporter exits may be laid. If you press ESCAPE in the screen editor, any transporter whose exit has not yet been located will be placed at the position of the cursor regardless of what is there.
Every Master shield (type 4) is worth 8 shields of type 1, or any valid combination in between. For example, you could have one shield of type 3, one shield of type 2 and two of shield type 3, to produce one sheild of type 4. The C key will bring up a window of statistics telling you how many characters of each type there are in the entire maze. The number after the Master shield includes the nearest number of Master shields the computer *expects* from all the other shields. This is based on the mathematical relationship:
total no. of shields that need to be collected to complete the game
= (total type 1)*8 + (total 2)*4 + (total 3)*2 + (total 4)
But it's up to you to make sure that puzzles are not impossible to solve due to a missing shield of a certain type!
Thanks to the design of the game, screens are easy to test out. Each time you press 1 from the main menu to play the game you start from the point reached on the previous game. So if you are about to make a risky move, or want to try out a puzzle arranged with the Editor:
- Press ESCAPE to quit the game/editor and return to the main menu;
- Save your current position (see below);
- 3. Try out your next move, and
- 4. If necessary press ESCAPE and reload your previous position.
However, to complete the game you may not take this short-cut because you must start the game from the beginning if you are to collect all of the Master shields, i.e. zeroise the counter at the bottom right of the screen!
Press 3 from the main menu to enter the sprite editor. Like the screen editor, there are two windows in the lower section of the display: one shows characters available for editing, the other the character at its true size. The editing window above is an exploded view of the current character in which the design takes place.
Key operations work slightly differently insofar as pressing SHIFT-1 to 8 will display the character corresponding to the one in the character window. Keys 0 to 3 (without SHIFT) will colour the square at the cursor position in black, red, green, or yellow respectively. Use the cursor keys to move around the editing window.
Saving And Loading
Pressing 3 and 4 on the main window will load and save respectively the current screen and set of characters. Enter the filename into the load/save window. Filing system errors are trapped and reported; if this should happen, press any key to return to the main menu.
The filename of the default screen is LEVEL. Do not save your own screen under this filename! It must be loaded in each time you wish to start the game from scratch.
Summary Of Controls
Main Game
A - Left, S - Right, P - Up, L - Down, M - Show map, ESCAPE - Quit game
Screen Editor
Cursor keys . Move cursor   SHIFT+Cursor keys ..... Jump to next section
0-7 ..... Place character   SHIFT+0-3 .............. Place shield (alt.)
C .... Display statistics   T ................... Go to transporter exit
W .......... Clear memory   ESCAPE ................................ Quit
Sprite Editor:
Cursor keys ........ Move cursor   SHIFT+0-3 ............. Colour square
SHIFT+1-7 .... Display character   ESCAPE ......................... Quit
Techinical Note For BBC Master Owners
Shields uses data in the Basic ROM, currently assembled with Basic II addresses. In order for the game to work properly on a BBC Master, the main game code, called SHASS, must be assembled with Basic IV addresses. This can be done by reassembling the machine code which automatically detects which computer (BBC or Master) it's running on. Type:
PAGE=&2300
CHAIN"U.SHASS"
Don't worry about the messages printed at the top of the screen, they are a list of addresses of the machine code routines READ into BASIC variables in the SHGAM program. The game code, called SHCODE, is now saved. (The ASSEMB program has also built in a delay routine, otherwise the game runs too fast on the Master.) More details can be found in the accompanying technical article.
Technical Guide To Shields
1. Filenames
All Shields files are stored in the H directory of the EUG #62 disc.
| TITLE | Loader program which draws introductory screen and CHAINs... |
| SHGAME | Main Basic control program. Note that PAGE must be at &2200; this is done automatically by TITLE. |
| SHCODE | Machine code and data |
| SHLEVEL | Default sprites and maze data (load this in to play the original screen, else the filename of your own maze) |
| DESCHRS | Short sprite file of characters used in sprite/screen designer |
| SHASS | Source code, loads in DESCHRS and saves this plus the assembled code as SHCODE |
2. Notes on source code 'SHASS'
I have provided brief notes on what each routine does, referred to label by label. I use a convention of writing labels in CAPITAL letters in the text to distinguish them from prose; conversely they are in lower case letters in the programs to distinguish them from assembler mnemonics. SHASS is divided into four main parts: (1) Sprite editor routines (2) Screen editor routines, (3) Main game section, and (4) sprite print/sound generation etc.
2.1 Sprite editor routines, CSCR to GETBYT
CSCR sets up sprite (character) editing screen. Draws window number 10, index=140 - see WIN for explanation), the editing window. This is where the enlarged character appears. In common with screen editor, two bottom windows at BOTWIN are drawn. ENLAR blows up current character into editing window. CCURS prints editing cursor.
ENLAR explodes current character into the editing window. Current x and y cursor co-ordinates preserved on stack. SCR is set to &6E08, screen address where enlargement begins, the bottom right of enlarged character. XPOS and YPOS set to count 12 across and 12 down. For each (XPOS,YPOS), the pixel colour is extracted using READCO and 1 column (8 bytes) of colour fed into screen memory at SCR. Then scr=scr-8 to get to next screen position on same line. When 12 pixels have been exploded, scr=scr-&E0 to get to far right of next line up, and so on until all 12 rows done.
CCURS prints editing cursor. Loop set up to change 1 column of the screen into a series of stripes by EORing alternate rows with &FF. Note this is different to the screen editor where the cursor is a solid block; makes cursor easier to see.
ADD14 Editing cursor's co-ordinates go from 0 to 11 in horizontal x and vertical y directions; x=x+14 and y=y+6 to get to the correct position on the actual display - top left of editing window is (14,6) in (columns,character rows).
ADDCO adds pixel of selected colour to enlarged sprite in editing window, and to actual-size sprite in bottom right window using WRITECO.
READCO reads pixel colour from a byte of data. Correct byte is obtained by GETBYT. The number of times the byte needs to be shifted left is (x cursor position) AND 3 to get high bit of the pixel colour into bit 7 of Accumulator. This high bit is rotated out into &72, and four more ASLs and another ROL are needed to get low bit of the colour into &72. Now &72 contains a colour number 0-3.
WRITCO writes pixel colour to byte of data. Correct byte obtained by GETBYT. MSKS is table of masks that, given pixel position, tells you the corresponding bits which are to be masked out. CCD2 is a table of Mode 5 screen bytes consisting of a Black, Red, Yellow, and White pixel respectively at leftmost position: &00 = %00000000 (BBBB), &08 = %00001000 (RBBB), &80 =%10000000 (YBBB), and &88 = %10001000 (WBBB). This value is shifted right (x cursor position) AND 3 number of times to get pixel in the right position, and finally ORed into the data byte.
REALSIZ prints the sprite currently being edited at its real (true) size in the window at bottom right.
GETBYT retrieves correct byte of sprite data given the x and y pixel (cursor) positions, = (y AND 12)*3 + (y AND 3) + (x AND 12). This forumla is derived from how the sprite data is stored; see SPRITE for more details.
2.2 Screen designer routines, ESCR to PCHAR
ESCR sets up editing screen. Window no.4 is the designing area in which the miniature characters are placed to make puzzles. BOTWIN is implicit in ESCR (called in CSCR) which draws the character window (no.5) and real-size sprite window (no.6).
ADDCH adds char to designing area at cursor position. On entry A=number from INSTR in Basic program, i.e. valid key number. First of all check to see if transporter being overwritten. You can press shift 1-4 (valid key number 8-11) to place a shield which corresponds to chars 3-6, if this is so then correct char = (A-8) EOR 3 + 3. If character added was a transporter call ADDTR check whether entrance/exit is to be laid.
ADDTR adds transporter entrance (SHNO=1) or exit (SHNO=0) is to be laid. Branch to TOUT if it's transporter exit, i.e. 2 key pressed a second time. If a transporter entrance, search for free space in TRNSF, a list of transporter entry co-ordinates: X co-ordinates at TRNSF to TRNSF+&3F, y co-ordinates at TRNSF+&40 to TRNSF+&7F. Item in list is &FF if it has not yet been set to a co-ordinate. If no free space found (64 transporters used) then beep and exit. TOUT puts current cursor x co-ordinate in at TRNST+SHY, current y co-ordinate at TRNST+&40+SHY. SHY was set to transporter number when entrance was laid.
INPF input filename routine. Enter Filename and string of - characters printed in double-height thin text. OSRDCH at &FFE0 to get ASCII value of letters typed in at keyboard. Valid chars stored at &100 onwards, if DELETE pressed replace last character with -, until RETURN pressed or filename reaches 10 characters.
SCRLL scrolls design window up or down. A=+ve for a downwards scroll, -ve for upwards scroll. Maximum possible y co-ordinate is 48 because total playing area is 32*64, window shows 32*16 chars at a time, and 48 + 16 = 64.
FINDT looks for transporter entrance whose co-ordinates are same as cursor. Negative flag=0 if a match is found, N=1 if no match found.
GOTOT relocates cursor at transporter exit if a transporter entrance found at cursor co-ordinates.
DELTR deletes transporter entrance and exit if entrance is found at cursor co-ordinates. Character removed from screen and entry in TRNSF and TRNST tables reset to &FF.
PERR prints error message in window no.112. OS stores address of error messages at &FD/&FE; this routine gets each character of message and prints them in the special font.
CLRMM clears area of memory containing screen data. Irreversible operation so the W key must be pressed twice for it to take effect.
CALCSH calculates number of map pieces, transporter characters, and shields placed in maze. Results stored at STATV. Theoretical maximum number of any one character is 32*64 = 2048 (a 2-byte integer) = total number of positions in playing area. Numbers are stored 8 low bytes followed by 8 high bytes.
CSTAT calculates statistics (see CALCSH) and displays results in window no.3. YCNT is a counter and also sprite no. going from 1 to 6. Alongside each sprite is shown number of times that character has been used; uses GNUM to print number in ASCII digits.
CURS prints cursor by EORing (inverting) 8 bytes (1 column) of screen memory with &FF.
READ reads character from the map. Note YPOS is the cursor y co-ordinate on current map quarter (0..15), YP is co-ordinate of top left of the quarter (0,16,32, or 48), and so YPOS+YP gives actual position on map.
V31 performs equivalent of VDU31,X,Y.
DITH2 dithers &2200 bytes screen starting at &5B00 (see DITH).
WRITE writes character to the map. YPOS+YP gives effective position on map: YPOS is cursor y on current map quarter (0..15), YP is top left of that quarter (0,16,32, or 48).
ADD4 adds 4 to x and y cursor co-ordinate and calculates screen address because top left of the design window is 4 columns in and 4 character rows down the screen.
KEYPR clears the keyboard buffer with equivalent of *FX21,0 and waits for a keypress.
DRWMAP draws map in miniature character form in design window. Each is read from map. First shape appears at SCR=&5D20, next at SCR=SCR+8 and so on 16 characters, then SCR=SCR+&40 to get to the beginning of the next line, and so on for 16 rows (one quarter of entire map is shown at any one time).
PCHAR prints a miniature character. A=character number (0=space, 1=map piece, 2=transporter etc.). Data is at CHRDAT + A*8, each shape 8 bytes (1 column) large.
2.3 Main game section, DECSH to CLCM
DECSH decrements number of Master shields left to make and collect. Note drop-through into...
GNUM prints 16-bit number, X=NWRK=low byte and A=NWRK+1=high byte, in decimal ASCII in double-height font. First of all see how many times 1,000 can be subtracted from the number before it becomes zero or negative, for example we can take 1,000 away from 1234 twice. This is the thousands count stored at NWRK+6. Next see how many times 100 can be taken away from the remainder - twice in this case, so NWRK+5=2. Then NWRK+4=3 and NWRK+3=4. These numbers have &30 ORed in to get the ASCII digit and are sent to BLOWUP for enlargement.
DITH dithers (stipples to yellow/red) screen. On entry A=high byte of screen address (low byte always 0) from where dithering starts. X=number of &100 bytes that are to be dithered. &A5 is the code for YRYR, alternated with RYRY by EORing with &FF: &A5 EOR &FF = &5A, &5A EOR &FF = &A5 etc.
MAIN main game loop. Sets up 3 windows of playing screen. Sets QUIT and PZFLG (map piece) flags to FALSE. Prints Master shield above counter. Fades in screen. Checks for keypresses, QUIT can be set to non-zero by any of the routines below.
FADOUT fades out screen by right-shifting MSK, the value that each byte of a sprite is ANDed with, until Carry is clear. MSK goes 255,127,63,31,15,7,3,1,0. All but last of these are odd numbers i.e. C=1 until MSK=0.
FADIN fades in screen by left-shifting MSK and adding one, redrawing the
screen each time. MSK goes 1,3,7,15,31,63,127,255. Only when MSK=255 and
we multiply by 2 will a 1 be shifted into Carry, and that's where we stop.
CHECK checks location at current player position for transporter, map piece, or Master shield.
GETPZ player has picked up puzzle (map) piece and is able to display plan of maze by pressing M key, DECrement PZFLAG to &FF to signify this.
WHSK transports (whisks!) player to new location. Searches for a transporter whose entry co-ordinates match player co-ordinates. Make sound and fade out screen. Player co-ordinates set to corresponding exit co-ordinates, then fade in screen.
GETSH pick up Master shield and decrement counter.
UP,DOWN,RGHT, and LEFT. Deal with player moving up, down, right and left respectively. E.g. when moving up if char at (xpos,ypos-1)=7 =brick character do not move, else if it's a normal shield (4,5, or 6) check (xpos,ypos-2) for matching shield. If so delete shield at (xpos,ypos-1) and replace shield at (xpos,ypos-2) with shield of next type. Characters 0,1,2 and 3 (space, map, transporter, master shield) are left to the CHECK routine.
SCAN scans keyboard with OSBYTE &81. On entry to SCAN, X=negative INKEY no.
KEYS checks for keypresses, also if Escape pressed DECrement QUIT flag to &FF.
DRWMAP2 draws plan view map in long window on right hand side. Starts at address SCR=&5DF0. Each char represented by a double-height pixel coloured according to scheme in SYMBOL table. A 4-pixel byte is made up and stored in the screen RAM in a similar manner to WRITCO (see section 2.1).
UPDATE draws adventure screen from (XPOS-3,YPOS-3) at top left to (XPOS+4,YPOS+4) at bottom right. If (XPOS-3,YPOS-3) is -ve then we are off the map so brick character substituted.
WRTMAP writes A to map at (X,Y). Characters are represented by one nybble in memory. IF x co-ordinate is even we need the high nybble, else if x is odd we need low nybble.
GETMAP gets the character in A at (X,Y).
CLCM calculates the byte in memory in which the wanted nybble resides:
MAPDAT + (Y DIV 2) + (X*32).
2.4 Sprite/sound routines etc., MSSG to SNDTAB
MSSG prints text at &100 in double-height, thin characters. Uses OSWORD 10 to get character definition, each line of which multiplied by 2 and ANDed with itself to achieve the thinning effect.
CALC calculates screen address: X*8 + Y?(SCRTAB) + Y?(SCRTAB+32).
SPRITE Main sprite routine. Each sprite 3 columns by 12 rows, becoming 4x24 when printed double height. Data is stored thus: 0,1,2,3,4,5,6,...34,35. Displayed thus:
   0    4    8   Char row 1
   0    4    8
   1    5    9
   1    5    9
   2    6   10
   2    6   10
   3    7   11
   3    7   11
   -----------
   12  16   20   Char row 2
   12  16   20
   13  17   21
   13  17   21
   14  18   22
   14  18   22
   15  19   23
   15  19   23
   -----------
   24  28   32   Char row 3
   24  28   32
   25  29   33
   25  29   33
   26  30   34
   26  30   34
   27  31   35
   27  31   35
BLANK fills 3 column x 24 row area of the screen with zeroes. Having a dedicated routine for this saves storing a blank sprite.
WIN draws window. Data for each window consists of 14 bytes: 9 for a graphics window, 4 for a text window, and 1 for a VDU12. Routine is called with X=window no. * 14:
 No.  X index Description
 ---  ------- -----------
  0      0    Play area in main game
  1     14    Map window in game
  2     28    Master shield counter display in game
  3     42    Statistics window in screen designer
  4     56    Design area in screen editor
  5     70    Miniature character display window in sprite/screen editor
  6     84    Real-size character window in sprite/screen editor
  7     98    Main menu window
  8    112    Error message window
  9    126    Filename input window
 10    140    'Exploded character' window in sprite editor

MKSND generates a sound using OSWORD 7, sound number in A:

 No.        Description
 ---        -----------
  0         Set transporter entrance in screen editor
  1         Set transporter exit screen editor
  2         Collecting map puzzle piece
  3,4,5,6   Collecting shield
  7         Transporter
SPTTAB Table of sprite addresses, 8 low bytes followed by 8 high bytes.
SCRTAB Table of address of start of each character row in Mode 5, stored 32 low bytes followed by 32 high bytes.
WINDAT list of 11*14 bytes of VDU data for graphics windows. OPT FNwin(topleftx, toplefty, length, width) assembles VDU sequence for a window starting at (topleftx, toplefty) of size (length * width) in text characters.
SNDTAB Table of channel, envelope, pitch, duration data for the 8 sounds.