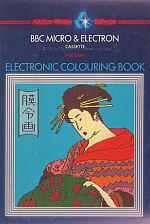
Blurb
No brushes, no paint, no mess, no fuss...
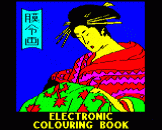
...but hours and hours of fun. With the Electronic Colouring Book you sit and watch as your 'paintings' are displayed on the screen before you.
With 18 pictures to choose from, and a palette of 35 different colours, you'll hardly know where to start, but once you do you'll find it difficult to stop. Painting has never been so easy: areas of the picture fill with colour at a touch. There's a whole range of versatile features for you to try - although simple to use they will add interest and enjoyment to your artistic efforts! You can:
- choose between joystick and cursor control
- change the colour scheme of your pictures to any one of thousands of others
- add details to any of the pictures, or even draw pictures of your own!
- save your finished paintings to display at any time
The Electronic Colouring Book is simple to use, but the results are so fascinating and spectacular that it is sure to appeal to anyone from 6 to 96. In fact, children will probably have a hard time getting their parents away from the screen.
Introduction
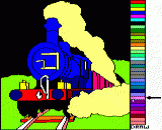
After loading, you may choose any of the pictures for colouring by pressing 'L' (for load). When the computer asks "Name", type in the name of your chosen picture - for example "SNAKES" - and press RETURN. The picture will then be loaded in and drawn on the screen. Be patient, especially if loading from tape - some pictures take longer than others. All the pictures are shown on the following pages with their correct names.
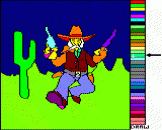
When the picture is ready for colouring, a small cross will appear in the centre of the screen. You may now choose between using a joystick or the cursor arrows on the keyboard. To begin painting, select a colour from the palette on the right by moving the cross first into the colour and then into the chosen area of the picture, and then press 'P' for Paint. That part of the picture quickly fills with colour. Carry on selecting colours and painting the picture until you have completed your work of art. When you have finished you may alter the colours, save the picture or erase it and try another. You may even add your own drawings - put a camel in the desert, give the clown a balloon or draw a totally new picture and colour that.
All the instructions and commands are listed on the back of this booklet. More detailed explanations are given in the following pages.
General Introduction
The start-up program loads the painting program in two parts, PART1 and PART2. PART1 sets up the screen and PART2 is the main painting program. PART1 should draw the 'palette' of colours down the right of the screen before loading PART2.
If you are using tape and do not have a motor control connection to your cassette recorder, you may need to stop the tape while PART1 is setting up the screen, before the computer is ready to load PART2.
When PART2 has been loaded, and the computer is ready, a small cross will appear in the centre of the screen. You use this to point to different parts of the screen. It can be moved by either the 'cursor arrow keys' (which are at the top right hand corner of the keyboard) or a joystick (instructions for using a joystick appear below).
Each colouring picture is supplied as a file. These follow the three program files on the cassette. In addition, each of four of the pictures have a corresponding file containing sample colouring sequences. The pictures you can choose from are shown, in the order that they are stored on the tape, later in this booklet. Underneath each picture is its name. The names of the sample colouring sequences are given in brackets under the appropriate picture. Instructions for using the saved colouring sequences appear in the sections on saving and loading files.
Loading A Picture
Press 'L' for Load and you will be asked for the name of the picture you want to load. Type in the name (e.g. "SNAKES") and then press RETURN. If you are using tape, you need to play it. The picture will be drawn as it is loaded.
If using tape, you can search for the picture you wish to load using the rewind and forward controls on your cassette recorder. The name of the file at which the tape is currently positioned will be displayed at the top of the screen whenever you press Play. This information and the list of picture files available will help you to find the picture you want.
When the picture is loaded, the screen is cleared and no further information is displayed while the picture is being drawn. If the computer fails to read the program successfully you will hear a bleep. If using tape, you should rewind the tape to the start of the picture and start the loading procedure again.
Using The Cursor Keys
The cursor arrows are used to move the cross around the screen. If you hold down the appropriate key, the cross will move quickly across the screen in a series of jumps. To position the cross more accurately, tap the appropriate arrow key quickly and the cross will move in very small steps.
Painting A Picture
To select a colour, move the cross into the colour you want in the palette on the right (i.e. dip your 'paintbrush' in the 'paint'). The marker arrow at the right of the screen will point at the colour you have chosen. To paint a region, move the cross and the cross will move in very small steps.
Deleting Colour
You can only paint a region that is not already coloured. To delete the colour from a region, move the cross into the region and press 'D' for Delete.
Drawing Lines
To draw and colour your own pictures, or to add lines to the pictures supplied on the tape you must first move the cross into the word 'DRAW' at the bottom of the palette. Then move it to the point on the screen where you want to start drawing and press F for Fix. Use the arrows to draw to the next point required and press F again. To continue the same line, keep doing this. To start a separate line, move the end of the line to the word 'DRAW' again. (As soon as you reach the word 'DRAW' the unwanted section of line will disappear.)
To switch back to painting, move the end of the line into the colour you want.
Clearing The Screen
To clear the screen, press 'C' for Clear.
Joysticks
If you press 'J' you should find that you can use one of your joysticks to position the cross. When painting, use the fire button instead of 'P' and when drawing, use thefire button instead of 'F'. All other commands stay the same. Pressing 'J' again will switch off joystick control.
Saving The Results
To save everything that you have done since the screen was last cleared or since the last supplied picture was loaded, press 'S' for Save. Insert a blank cassette or disc and, when asked, type the name you want to use for the saved file and then press RETURN. If using tape your filename can be a maximum of 10 characters. If using disc your filename can be a maximum of 7 characters. When the saving process is complete, the line on the screen that is used for displaying instructions will be restored to its state before saving started.
Loading A Previously Saved Colouring/Drawing Sequence
Press 'L' for Load, type the name of the saved file and press RETURN. Note that if you save a colouring sequence for one of the supplied pictures, the save file contains only the colouring instructions and not the original picture. To restore the coloured picture, you must first use the 'L' command to get the picture and the use the 'L' again to load the colouring instructions.
Experiementing With Different Colour Strengths
Once a picture has been coloured, keys '1' to '8' can be used to change the basic colours and mixtures containing the basic colours. Pressing one of these keys will instantaneously change one colour to a new one. Pressing the same key seven times will cycle through all the possibilities for one of the basic colours. This gives thousands of possible colour combinations for a given coloured picture.
'E' for Experiment causes the computer to try random colour changes at one second intervals, 'Q' for Quit makes it stop and 'R' for Restore returns the normal colour settings.
Background Colour Change
If you prefer to work with white lines on a black background, press 'B' for Background to change black to white and white to black.
Command Key Summary
| Arrow Keys | Used to move the cross around the screen |
| P | Paint the area marked by the cross |
| D | Delete colour from the area containing the cross |
| F | Fix a point on the line being drawn in drawing mode |
| J | Switch joystick mode on or off |
| S | Save a drawing and colouring sequence in a file |
| L | Load a supplied picture or a saved sequence |
| 1 to 8 | Instantaneously change one of the basic colours |
| E | Experiment with different basic colour settings |
| Q | Quit experiment with colour settings |
| R | Restore the standard colour settings |
| B | Change background colour (swap white and black) |
ISBN 0-201-14431-X


